
- If you’re a network administrator, there are certain must-haves when it comes to tools. Ping, tracert, and pathping are among the most important ones.
- Pathping is a Windows tool you can use to determine the route between you and a server of your choice and check the ping of each hop.
- Check out our Packet Loss section to learn more about this issue and how to fix it.
- Visit our What Is Hub, browse our encyclopedia of technical terms, and bookmark it for later.

When you connect to the Internet, your PC doesn’t establish a direct link to the destination server. Instead, your connection bounces multiple times before it reaches the website/service.
Imagine you have to pull power from a plug, but you’re far, far away, so you use multiple extension cords. When you’re online, the power plug is the server you’re trying to reach, and the power strips are the servers you bounce through to reach it.
Quite simple when you put it like that, right?
There are several reasons why there’s no direct line between you and the destination server. For once, the world would be tangled in wires and cables, was it not for data hubs.
Security is also a concern since any potential attacker would have to pass through several locations in order to reach its final goal.
But enough with the analogies, you’re here to learn about data routing and pathping.
What is pathping?
To put it simply, pathping is a Windows tool you can use to determine the route between you and a server of your choice and check the ping of each hop. If you’re familiar with ping and tracert, imagine pathping as a fusion of the two.
Pathping is a trustworthy ally in network troubleshooting. You can use it to determine the ping of each hop between the source (you) and destination. After the test concludes, you’ll learn not only if there’s any packet loss, but also where it occurs.
What does pathping do?
- Checks the route between you and the destination of your choice (another device)
- Sends a number of echo requests to each hop between you and the destination
- Receives a number of echo replies from each hop
- Calculates the percentage of lost data (packet loss) based on the number of packets returned by each hop
Therefore, pathping should be your immediate thought when packet loss testing is mentioned. If you’re a network administrator, it’s a great way of keeping things under control by running regular checks and seeing if any routers are leaking packets.
As we’ve mentioned in some of our other articles, one of the most common causes of packet loss is network congestion.
Therefore, if you notice this phenomenon, you might need to find ways of managing your subnets properly or even increase your router‘s capacity.
How to use pathping?
- Launch CMD in administrator mode
- Type pathping (no arguments) to see the help

- Use the syntax below with the appropriate arguments, as needed
pathping [/n] [/h] [/g <Hostlist>] [/p <Period>] [/q <NumQueries> [/w <timeout>] [/i <IPaddress>] [/4 <IPv4>] [/6 <IPv6>][<TargetName>]
- /n – skips resolving the IP address of intermediate routers to their names
- /h <max hops> – use with a numeric value and without the <> to define the maximum number of hops (default is 30)
- /g <Hostlist> – uses a series of IP addresses separated by spaces
- /p <Period> – define the number of milliseconds pathping waits between successive pings (default is 250 ms)
- /q <NumQueries> – lets you specify the number of echo requests pathping sends to each hop (default is 100)
- /w <timeout> – define the number of seconds pathping waits for each echo reply (default is 3 seconds)
- /i <IPaddress> – lets you specify the address of the source
- /4 <IPv4> – forces pathping to use exclusively IPv4
- /6 <IPv6> – forces pathping to only use IPv6
- <TargetName> – lets you specify the destination of the route, either hostname or IP address
- /? – displays the help dialog, which you can also see by running pathping without arguments
How to read a pathping?
Reading a pathping is quite easy when you get the hang of it. For this test, we’ve saved the results to a local file on our computer by appending the >> (destination) argument at the end of the command.
We’ve annotated the screenshot below and explained which hop belongs to who in our packet loss test. Use them as a guide to determine the hops in your tests.
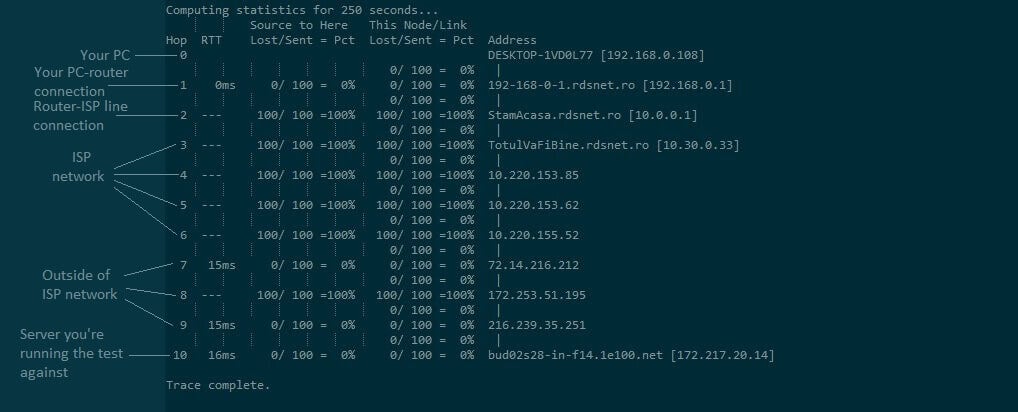
Note that sometimes, the number of hops may vary depending on the ISP and the servers outside of your ISP’s network.
As the hop number gets higher, the connection strays further away from the source (your PC). The first and last hops belong to the source, respectively the destination of your route.
Pathping vs tracert
As we’ve clarified above, pathping isn’t the same thing as tracert. Tracert only traces the route between you and the destination you chose and displays it for you to see.
Pathping traces the route, but also pings each hop on the way and returns the results for you to analyze. It also calculates the amount of lost packets for each hop between you and the destination.
So pathping isn’t the same thing as ping, nor as tracert. It’s actually a combination of the two, that brings the best out of each. Use it wisely.
FAQ: Learn more about pathping?
- What is the difference between pathping and tracert?
Pathping returns the traceroute between a source and a destination, along with ping and packet loss values for each of the hops it encounters along the way. Tracert only shows you the route between the source and destination (no ping).
- What is the difference between ping and pathping?
Running ping will only return results that show the availability (ICMP) and health of the destination, which only happens if all the intermediary hops are up. Pathping displays the entire route and the health/availability of each hop.
- What is pathping used for?
Pathping is a TCP/IP Windows command-line tool that can provide you with handy details about latency and packet loss on hops between a source (you) and a destination (the server you’re testing against).