
If the WiFi option disappeared on Windows 11, don’t worry. This happens due to various issues, such as outdated/corrupt network drivers or system glitches. In this article, I’ll give you the best solutions to resolve the problem.
But before I go to specific troubleshooting tips, do the following prechecks:
- Restart your PC to fix network connectivity issues and temporary glitches.
- Restart your modem and wireless router.
- Ensure your device has WiFi enabled by checking Control Panel Network Connections and some laptops’ physical WiFi switches or function keys (like Fn + F9).
- Check for and install any available Windows updates.
- Reset your BIOS/UEFI motherboard settings to default or update BIOS.
If you still haven’t solved the problem, do the following:
1. Run Network Troubleshooter
I suggest running the Network Adapter troubleshooter to diagnose and fix issues with wireless and other network adapters.
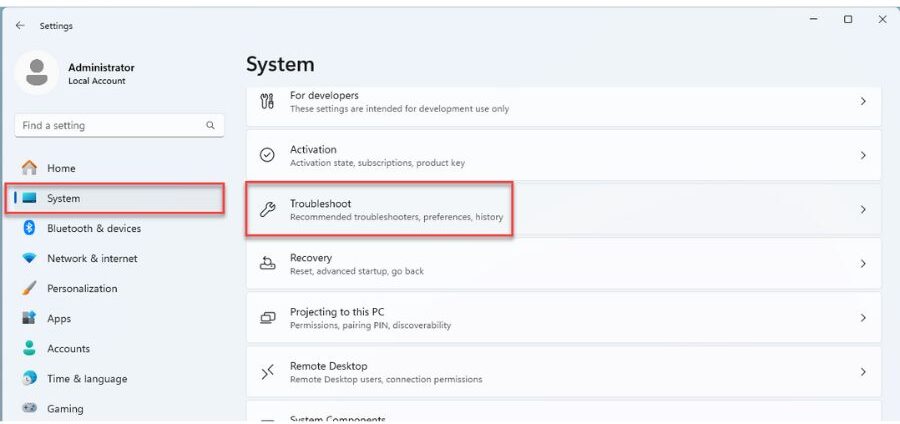
1. Right-click on the Start button and select Settings.

2. Select “System” from the left sidebar. Navigate to the “Troubleshoot” option from the right side.
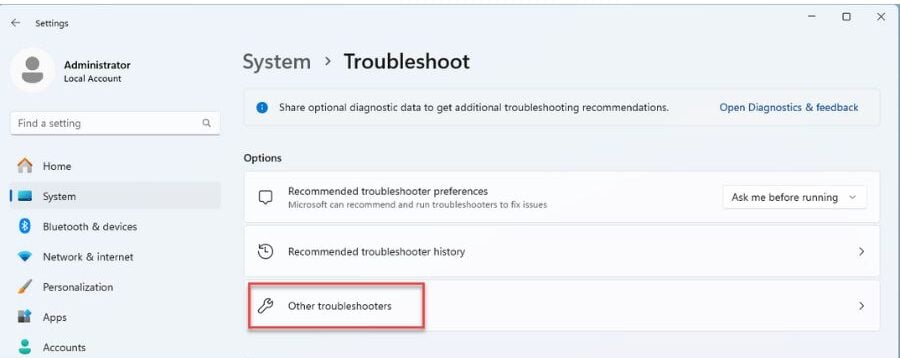
3. On the Troubleshoot page, click on the “Other troubleshooters”.
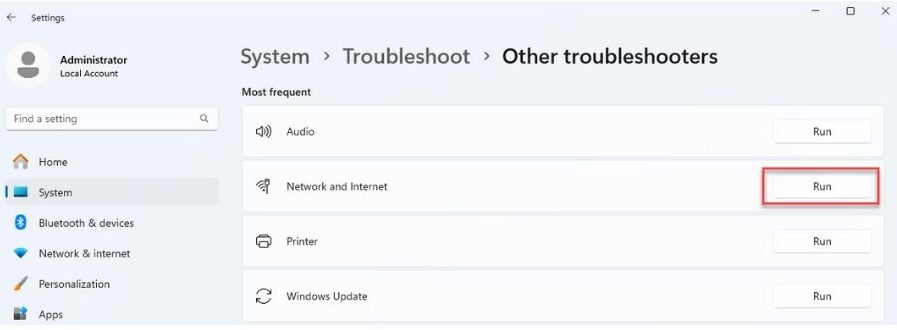
4. Scroll down the page, locate “Network and Internet,” and click Run.
5. Follow the on-screen instructions in the troubleshooter to see if that fixes the problem, and then restart your computer.
2. Update or Reinstall WiFi Driver
Update your WiFi adapter driver by visiting the manufacturer’s website and get the latest one manually. Alternatively, you can use third-party driver updater software, such as PC HelpSoft Driver Updater to automatically replace all outdated drivers with the best versions.
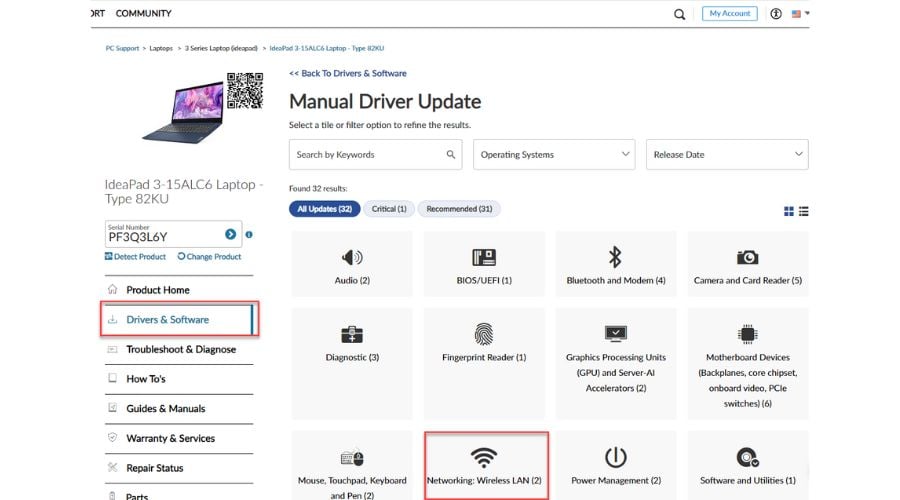
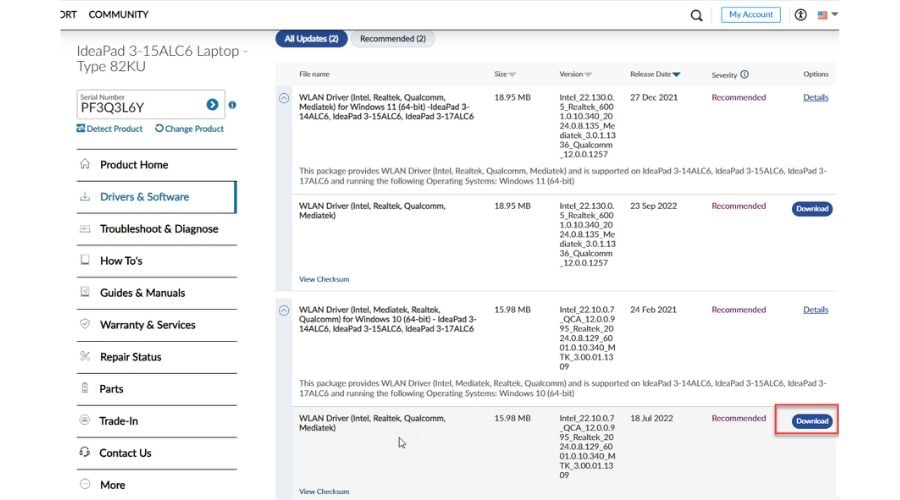
In this example, I’ll show you how to manually download the WiFi driver for my Lenovo IdeaPad 3 laptop.
1. Visit the laptop manufacturer’s website and enter your laptop’s serial number.
2. Locate the Drivers section, choose Windows OS version (Windows 11), and click “Networking: Wireless LAN.”
3. Download and extract the WiFi driver in your preferred folder before installing it. If you can’t find an explicitly written Windows 11 driver, the Windows 10 version should be perfectly compatible in most cases.
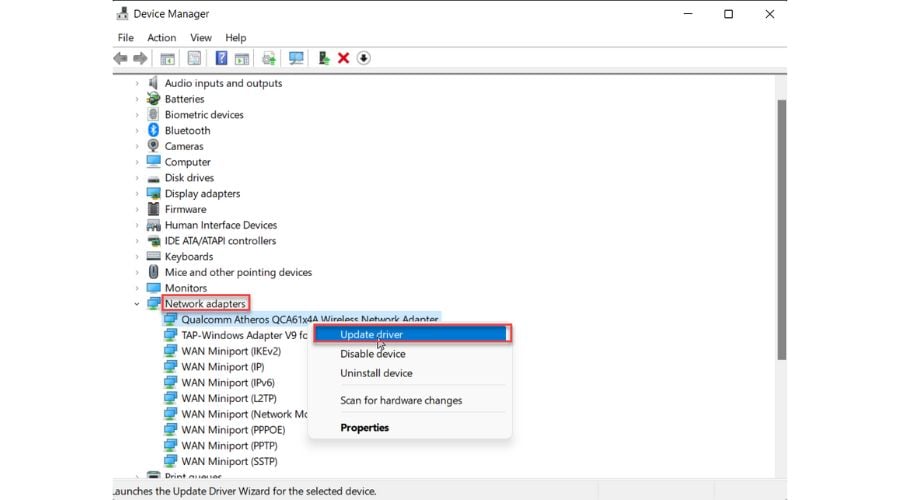
4. Right-click on the Start menu and choose Device Manager.
5. Locate your WiFi driver. In Device Manager, expand the section called “Network adapters.” Right-click on your WiFi adapter and choose Update driver.
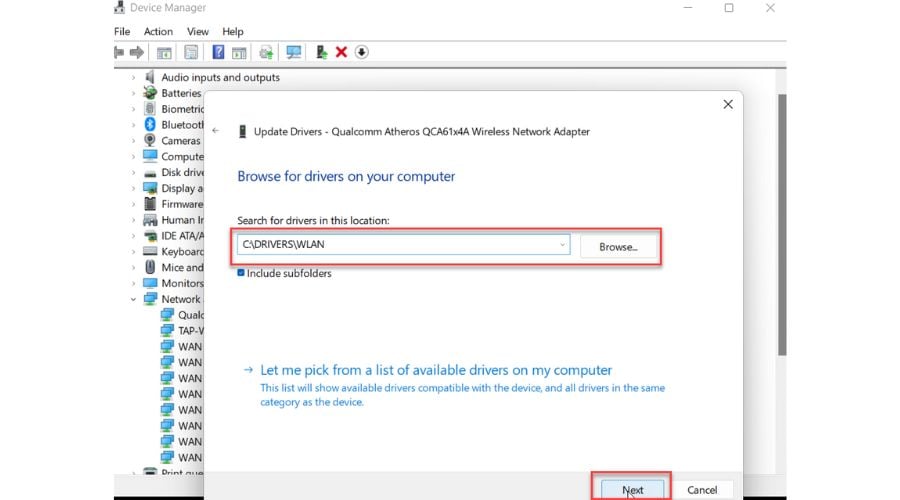
6. Browse for the folder where you downloaded and unzipped your WiFi driver. Click on the Next button.
7. Wait for the WiFi driver for Windows 11 to be installed. Click on the Close button.
8. Check if the WiFi issue is fixed.
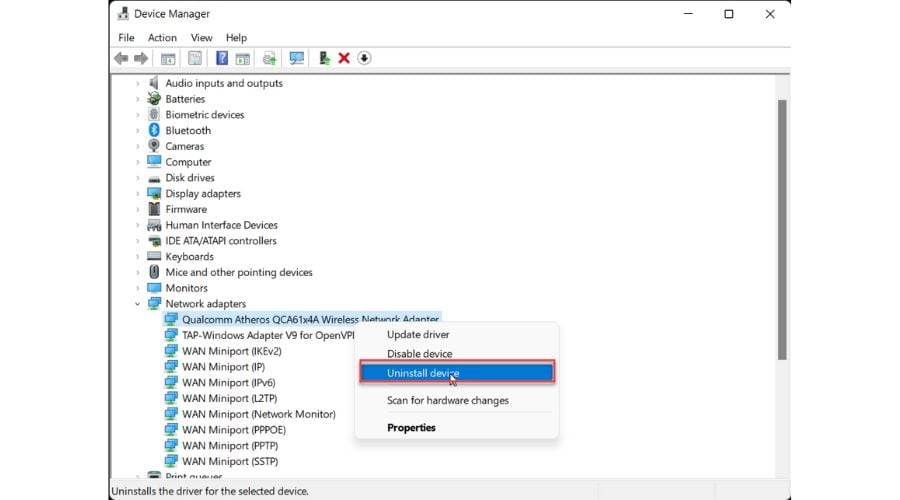
If the problem persists, try to remove your existing driver before updating or installing a new one.
1. In Device Manager, right-click on your WiFi adapter and choose “Uninstall device.”
2. Reboot your Windows 11 PC and install the new WiFi driver again.
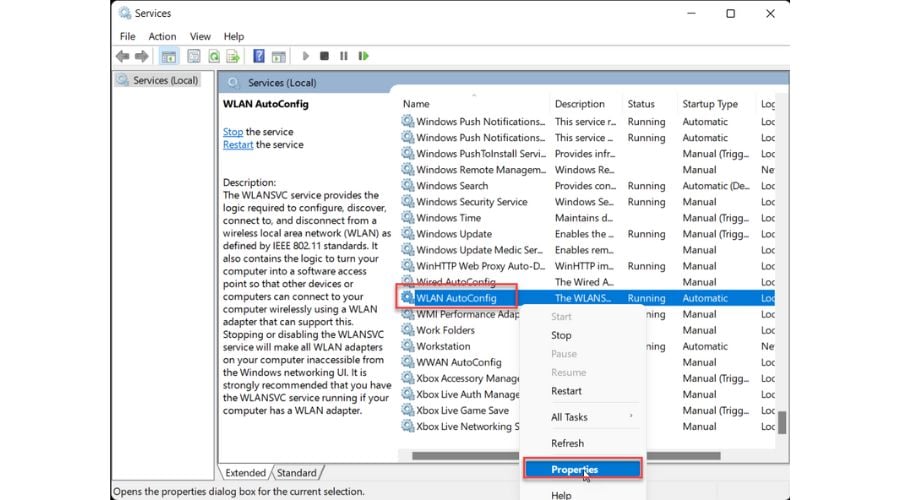
3. Check the WLAN AutoConfig Service
WLAN AutoConfig is a Windows service that helps your computer connect to wireless networks. If disabled, your WiFi won’t work. Make sure it runs automatically.
1. Press the Win + R keys simultaneously to show the Run dialog box.
2. Type “services.msc” and press Enter.
3. Locate WLAN AutoConfig in the list of services, right-click on it, and choose Properties.
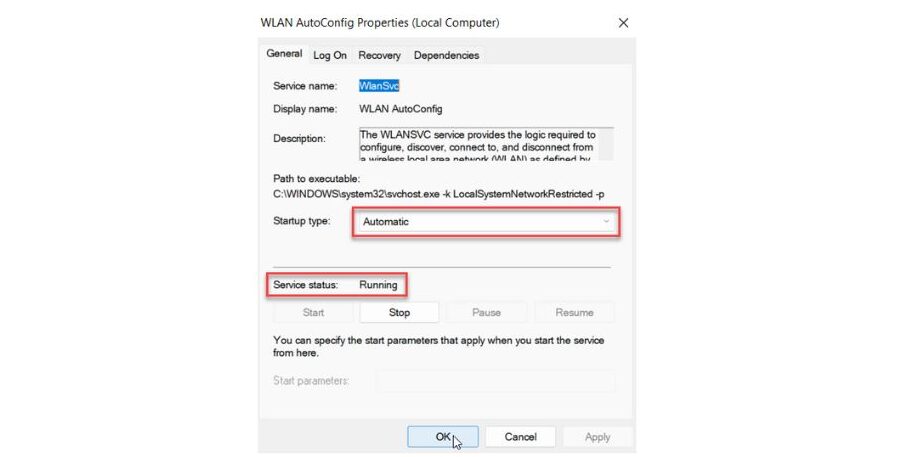
4. Ensure the Service status is Running and the Startup type is set to Automatic. Click OK to save changes.
5. Confirm any changes in WLAN AutoConfig by rebooting your PC and checking for WiFi.
4. Flush Your DNS Cache
Flushing your DNS will delete IP addresses or other DNS records from the cache. This can help resolve security and internet issues that may cause the WiFi option to disappear from Windows 11.
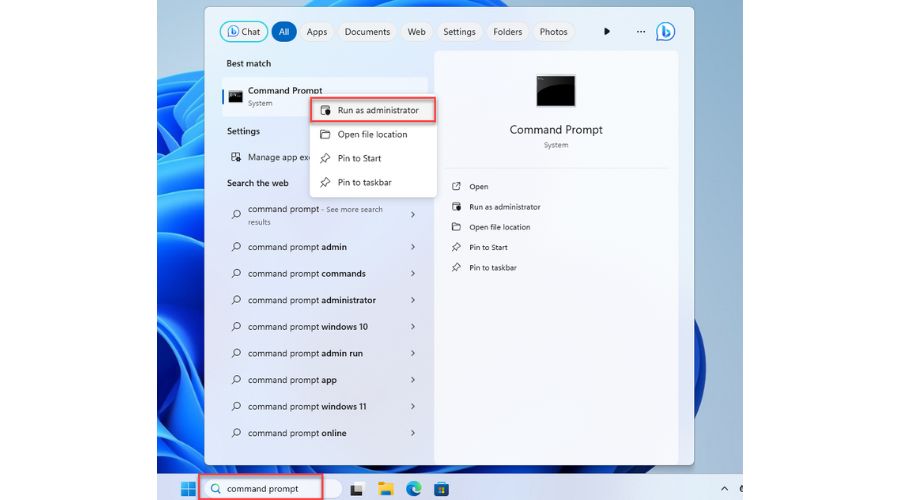
1. Type “Command Prompt” in the Search bar. Then, right-click to choose “Run as administrator.”
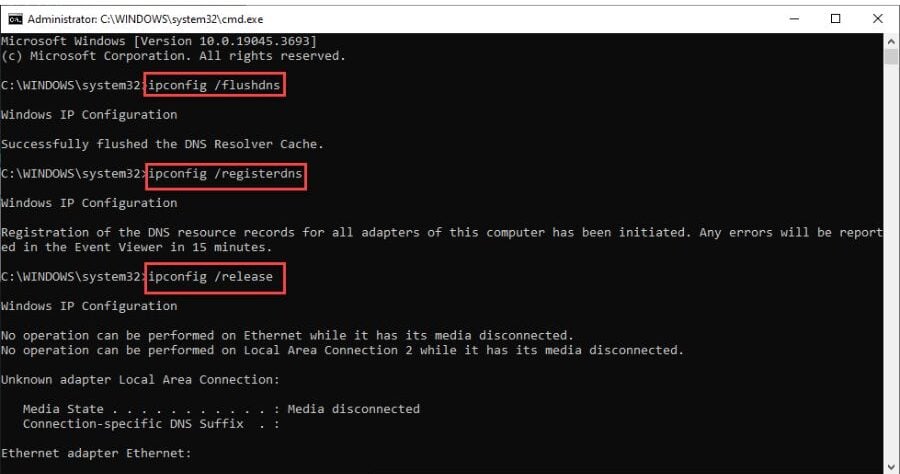
2. Type the following commands, and after each press Enter:
- ipconfig /flushdns
- ipconfig /registerdns
- ipconfig /release
3. Don’t close the Command Prompt yet. Type the following commands, and after each press Enter:
- ipconfig /renew
- netsh winsock reset
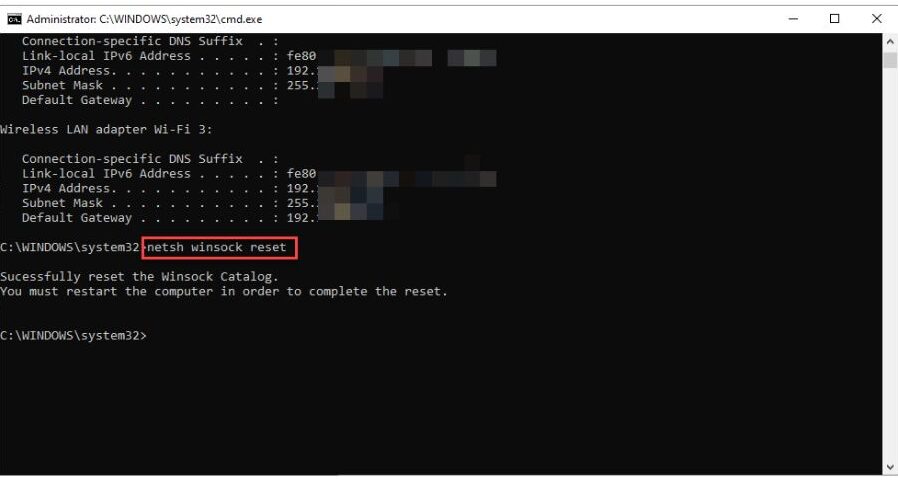
4. After executing all the commands, restart your computer and verify the status of the WiFi network.
5. Perform a Clean Boot
I suggest booting Windows 11 in a clean state to fix third-party software conflicts that may cause the WiFi option to disappear.
1. Press the Win + R keys to open the Run dialog box.
2. Type “msconfig” and press Enter to open the System Configuration window.

3. Open System Configuration, go to the Services tab, select “Hide all Microsoft services,” and click “Disable all” to uncheck the remaining services.
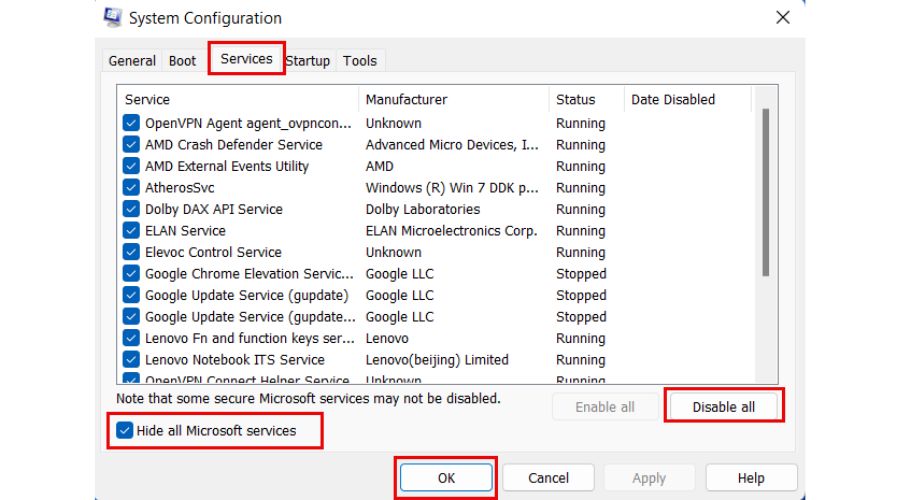
4. Confirm any changes by clicking on the Apply and OK buttons. Once you have done that, reboot your PC to ensure the changes take effect.
6. Check the Networking Icon in Group Policy
If you have Windows 11 Home Edition, you won’t be able to access the Local Group Policy Editor tool. Consider using a different version or try another solution.
1. Press the Win + R keys to open the Run dialog box.
2. Type “gpedit.msc” to open Local Policy Editor.

3. Navigate to the User Configuration > Administrative Templates > Start Menu and Taskbar.
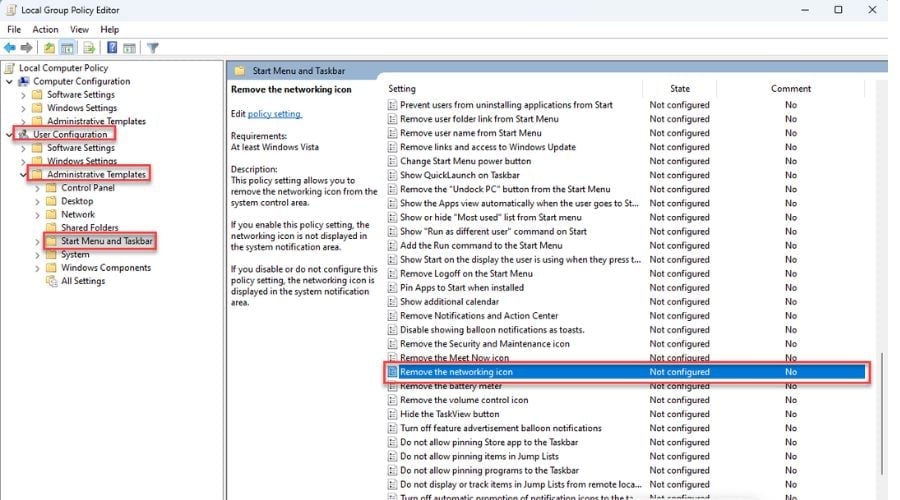
4. Right-click on the “Remove the network icon” and choose Edit.
5. In the “Remove the network icon” window, select Disabled. Confirm changes on OK and reboot your PC.
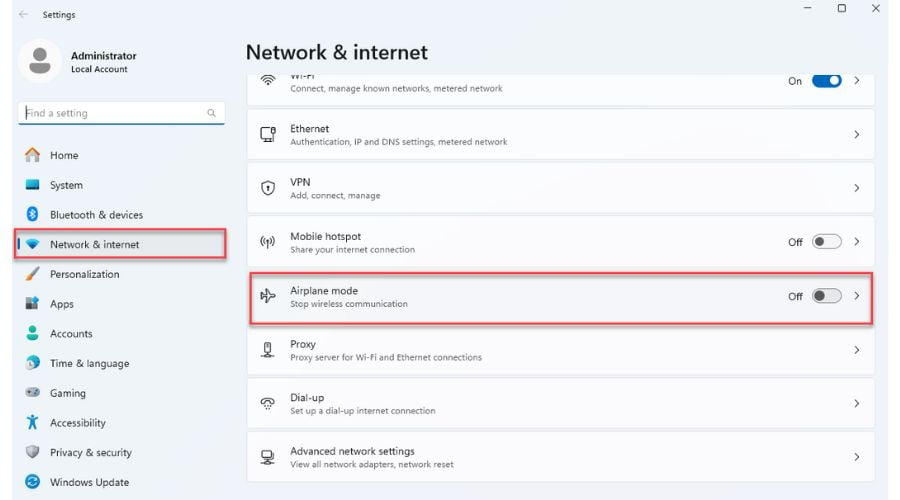
7. Turn Off Airplane Mode
The WiFi option may disappear in Windows 11 if the Airplane mode is turned on, as it halts all wireless communication.
1. Right-click on the Start button and select “Network Connections.”
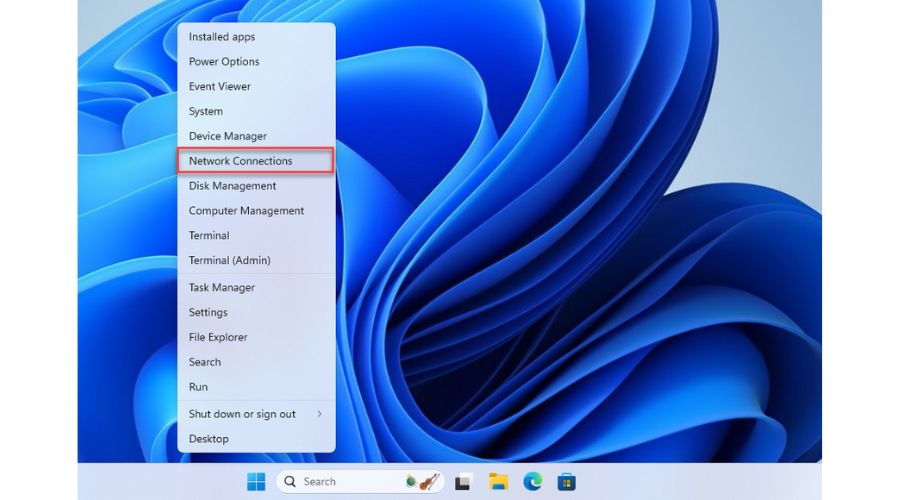
2. Make sure to turn off the Airplane mode.
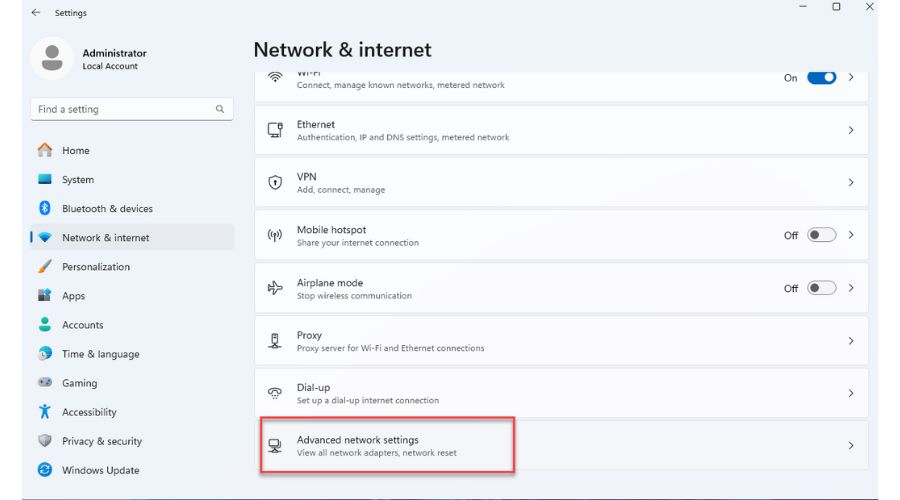
8. Reset Your Network Settings
If all else fails, you can try resetting your network. This process involves removing and reinstalling all your network adapters. Their settings will be reset to their default values.
1. Right-click on the Start button and select “Network Connections.”
2. On the “Network & Internet” page, click “Advanced network settings.”
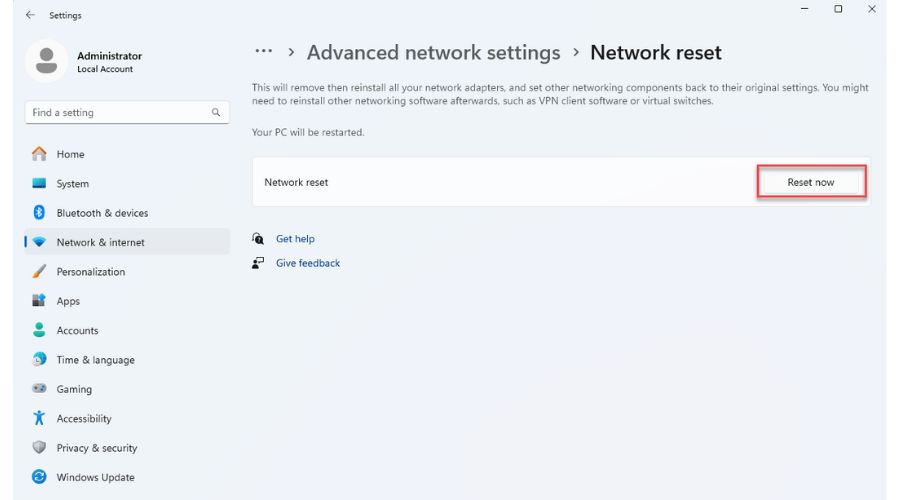
3. On the “Advanced network settings” page, click “Network reset.”

4. Finally, click on the “Reset now” button.
5. Confirm network reset action and reboot your PC.
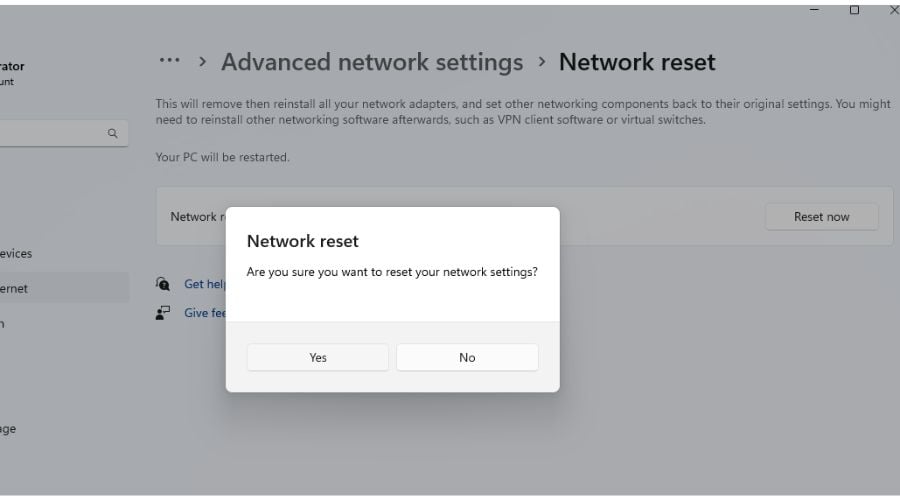
6. Upon rebooting, check if the WiFi issue is gone.
So, now you know what to do if the WiFi option disappeared on Windows 11. I have provided some solutions that anyone can follow. Feel free to leave a comment and share which one worked best for you.