

Snipping Tool
In my line of work a proper screenshot grabber is a necessary tool of the trade. Many people, however, only need to take a screenshot once in a while. And they don’t need all the bells and whistles that come along with a paid-for version, either. Enter the built-in Snipping Tool that comes bundled with Windows free of charge. Today’s Quick Tips article will show you where to find it and a little bit about how to use it. Read on…
How To Run The Snipping Tool
To open up the Snipping Tool, simply click on the Start button and start typing in snipping tool. Soon you will see it in the list. Click it and it will run. This is what you should see:

From here, you have a few choices you can make:
- New – Let’s you choose a new screenshot using the current settings
- Mode – This lets you choose between Free Form, Rectangular, Window, or Full Screen
- Delay – This is useful if you want to include a drop-down or pop-out menu in your screenshot
- Options – What it says
Delayed Screenshot
As an example, I will show you what this little program is capable of. Here is a screenshot of a Gmail page with the “More” drop-down menu displayed:
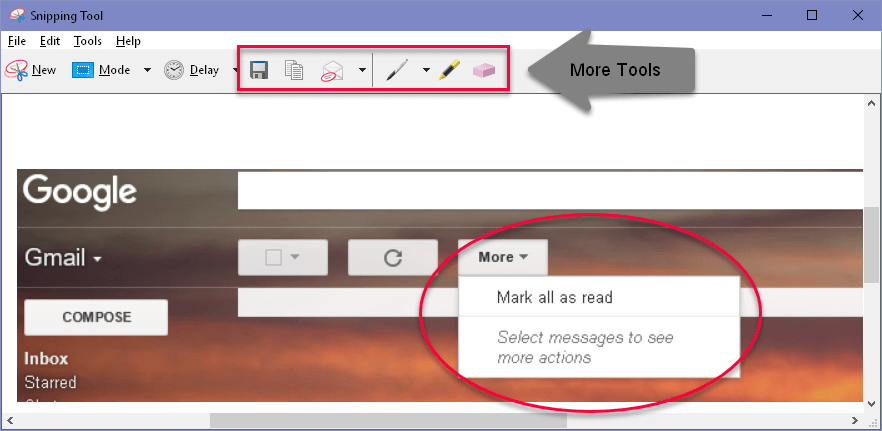
Basically, this is a screenshot of a screenshot. Screen grabbers can’t take screenshots of themselves, so I took this screenshot of the Snipping Tool with SnagIt, the grand-daddy of screen capture tools.
In order to get that drop-down menu to show, I had to set the Snipping Tool to Delay for a few seconds. That gave me time to click that More menu before the Snipping Tool made the capture. If this explanation is a bit blurry, you’ll simply have to experiment with it. You’ll soon figure it out.
You will also notice that several new tools have made an appearance once the capture has completed. Moving from left to right, they are:
- Save – Lets you save your screenshot to a file
- Copy – Copies the screenshot to the clipboard. From there you can paste it into your favorite image editor
- Send to – Let’s you eMail it directly, or as an attachment
- Pen – Lets you free-draw lines in various colors
- Highlighter – Lets you highlight portions of your screenshot
- Eraser – Lets you undo highlighting or lines you may have drawn
Final Thoughts
The Snipping Tool is a light-weight utility that is useful for the occasional screen capture, but is most certainly not intended to be used for more serious applications. Play around with it if you haven’t already done so. It may prove to be the only screen capture tool you’ll ever need.